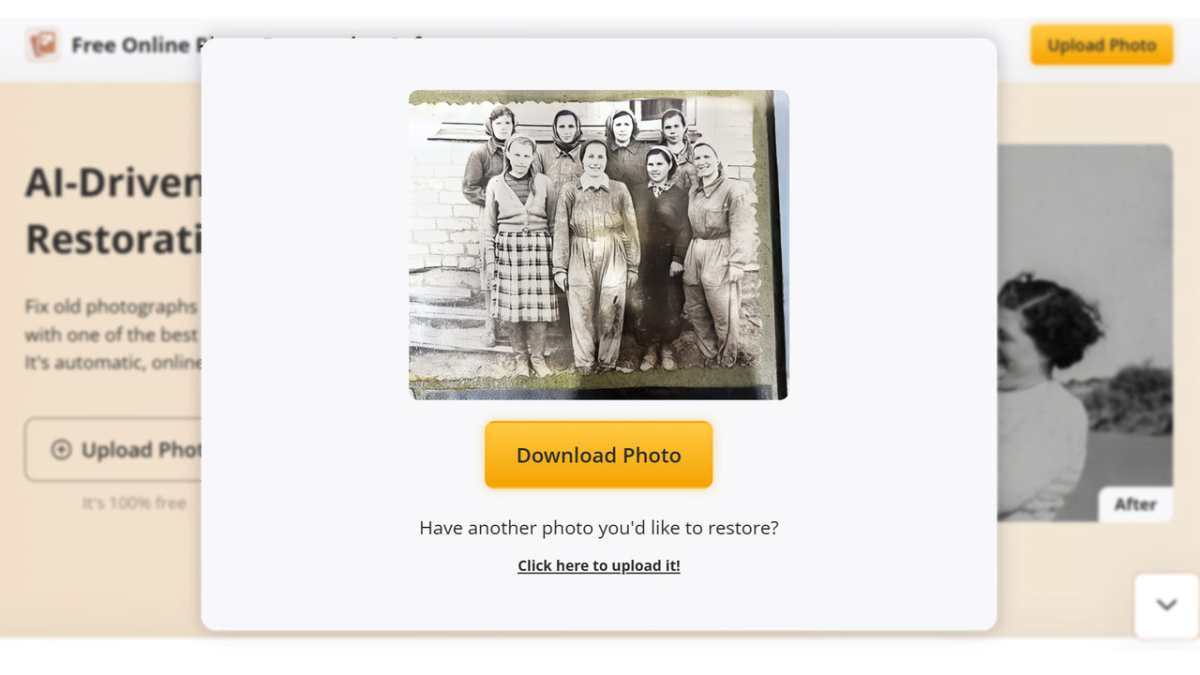
Printed menus have a real cost that most restaurant owners only notice when they add it up over a full year. Every price change, every seasonal item, every typo caught after a thousand copies have already been printed means another trip to the printer and another invoice. A QR code menu removes that cost entirely while giving guests a richer browsing experience than a laminated card ever could.
Creating a QR code for a menu is a simple technical task, but doing it in a way that actually serves your guests well requires a bit more thought than just pointing a code at a PDF. Here is how to do it properly.
Decide What the Code Should Actually Link To
The first and most important decision is what destination the QR code points to. There are a few common approaches, and they are not equally effective.
Linking directly to a static PDF of your existing printed menu is the fastest option, but it produces a poor mobile experience. PDFs are designed for printed pages, and viewing one on a phone usually means pinching, zooming, and scrolling sideways just to read a single line item. This technically works but frustrates guests rather than delighting them.
Linking to a properly formatted mobile web page is significantly better. A page designed specifically for phone screens, with clear categories, readable text sizes, and photos that load quickly, gives guests an experience that feels intentional rather than like an afterthought.
Linking to a full ordering platform takes this further, allowing guests not just to view the menu but to actually place their order and in many cases pay, directly from the same scan. This is the approach most restaurants benefit from most, since it removes friction beyond just menu viewing.
Step by Step: Creating Your Menu QR Code
Step 1: Choose your destination format based on the level of functionality you want. A simple mobile-optimized page works for restaurants that want a digital menu without full ordering capability. A complete ordering platform works for restaurants that want to streamline the entire guest experience from browsing to payment.
Step 2: Build or set up your digital menu content. This includes organizing items into clear categories, writing concise and appetizing descriptions, and ideally adding high-quality photos for at least your most popular or visually appealing dishes. Photos meaningfully influence what guests choose to order.
Step 3: Choose a QR code platform that supports dynamic codes. This is essential for a restaurant menu specifically, since prices change, seasonal items rotate, and dishes occasionally need to be removed when ingredients are unavailable. A static code locks your menu's destination permanently, while a dynamic code lets you update content behind the scenes without ever needing to print a new code for your tables.
Step 4: Generate the code using the URL or link code type, pointing to your menu's web address. If you are using a dedicated restaurant ordering platform, the code is often generated automatically as part of that platform's setup process.
Step 5: Customize the code's appearance to match your restaurant's branding. A code that incorporates your restaurant's colors or a small logo feels more intentional sitting on a table tent or printed card than a plain generic black and white square.
Step 6: Test the entire guest experience from scan to menu view. Sit at a table, scan the code yourself, and walk through it exactly as a guest would. Confirm the menu loads quickly, displays clearly, and is easy to navigate on a phone screen.
Step 7: Print and place the code where guests will naturally see it. Table tents, small acrylic stands, or printed cards near the place setting are common placements. The code should be large enough to scan easily and positioned where a seated guest can comfortably reach and scan it.
The Best Way to Generate the Code
For restaurants that want full control over the destination and the flexibility to update it as menus evolve, the convert link into qrcode tool from QR Tiger provides a strong, dedicated way to generate the code itself.
Dynamic functionality means that if your menu page address ever changes, or you want to redirect the code to point at a seasonal menu temporarily, you can do that instantly without printing new table materials. The design editor allows the code to be styled with restaurant branding, including custom colors and a logo, so the code feels like part of the table presentation rather than a sticker stuck on as an afterthought.
Analytics show how often the code is being scanned, which provides a useful signal about overall guest engagement with the digital menu, particularly helpful when testing whether a new table placement or design change affects how many guests actually use it.
For restaurants seeking the full ordering and payment experience rather than just a viewable menu, a dedicated restaurant ordering platform that includes QR code generation as part of its broader feature set is typically the better long-term choice, since it combines the menu display with order submission and kitchen routing in a single system.
Designing the Menu Itself for Mobile Viewing
The code is only half the equation. The menu it leads to needs to be designed specifically for the screen guests will be viewing it on.
Keep category structures simple and logical, mirroring how guests naturally think about a meal, such as starters, mains, and desserts, rather than overly granular subcategories that require extra scrolling and tapping to navigate.
Use real photography rather than stock images wherever possible. Guests respond to seeing the actual dish they would receive, and mismatched stock photography creates a disconnect that undermines trust in the rest of the menu.
Keep descriptions concise but evocative. A sentence or two that highlights key ingredients or preparation style does more for a guest's decision making than either a single word description or an overly long paragraph that takes too much scrolling to read.
Make dietary information visible without requiring a separate inquiry. Marking items as vegetarian, vegan, or gluten-free directly on the menu serves guests with dietary needs and reduces the volume of questions staff field during service.
Keeping the Menu Current
The biggest advantage of a QR code menu over a printed one is the ability to update content in real time, but that advantage only matters if it actually gets used. Build a habit of updating the menu as items sell out during service, as seasonal dishes rotate in, and as prices change, rather than treating the digital menu as a one-time setup that gets revisited only occasionally.
A menu that consistently reflects what is actually available builds guest trust in the system. When guests learn that what they see on the digital menu matches what the kitchen can actually deliver, they engage with it more confidently, which is ultimately the entire point of making the switch from paper in the first place.
Browsing and ordering from a digital menu works best on a reliable smartphone. Find the latest models and best prices at Priceka.
How to Create a QR Code for a Restaurant Menu was last modified: June 17th, 2026 by Isebella Peicov
Starting a print-on-demand business in 2026 is easier than ever, but choosing the right platform can still be a challenge. With dozens of providers offering different products, fulfillment networks, integrations, and pricing models, finding the best fit for your business requires more than simply picking the most popular option.
The good news is that today’s leading print-on-demand platforms make it possible to sell custom products without managing inventory, handling production, or shipping orders yourself. Whether you’re planning to launch a clothing brand, sell tech accessories, create personalized gifts, or monetize your artwork, the right platform can help you get started faster and scale more efficiently.
In this guide, we’ll compare and review the 5 best print-on-demand platforms in 2026 based on their product selection, ease of use, fulfillment capabilities, integrations, and overall value for beginners. By the end, you’ll have a clearer understanding of which platform is best suited to your goals and the type of print on demand products you want to sell.
Why Choosing the Right Print-on-Demand Platform Matters
Not all print-on-demand platforms offer the same products, features, or fulfillment options. While some specialize in apparel, others focus on tech accessories, personalized gifts, artwork, or sustainable products. Choosing the right platform from the start can help you build a business that aligns with your niche, target audience, and long-term goals.
The platform you choose can also impact product quality, shipping times, branding options, and overall customer experience. For example, a seller focused on custom phone cases may benefit from a different provider than someone building a clothing brand or selling wall art.
By selecting a platform that matches your business needs, you’ll be in a better position to launch products efficiently, manage orders smoothly, and create a stronger brand as your store grows.
Comparison Table: The 5 Best Print-on-Demand Platforms in 2026
Art-led products, apparel, stickers, mugs, and more
Free to join; artist margins and account fees may apply
Built-in marketplace audience
The 5 Best Print-on-Demand Platforms in 2026 — Compared and Reviewed
1. Podbase
Podbase is a strong choice for sellers who want to build a print-on-demand business around modern, practical, and high-demand tech accessories. Instead of focusing mainly on apparel, Podbase gives sellers access to customizable products such as phone cases, MacBook covers, AirPods cases, print on demand wall art, desk mats, mugs, and other branded items. This makes it especially useful for entrepreneurs who want to create a more focused store with products that are easy to position for gifts, lifestyle brands, creator merch, or ecommerce niches.
For beginners, Podbase is appealing because it removes many of the operational challenges that usually come with selling physical products. Sellers can start without inventory, connect their store through integrations such as Shopify, Etsy, WooCommerce, Order Desk, or Open API, and let Podbase handle printing, packing, and worldwide shipping. The platform also highlights fast fulfillment and a strong background in tech accessory production, which gives new sellers a clear direction when choosing print-on-demand products.
Podbase stands out most for its niche focus. While many POD platforms offer broad catalogs across apparel and home goods, Podbase is built around tech accessories and selected customizable products. This makes it a great option for sellers who want to build a professional-looking POD brand without getting lost in an overly broad product catalog.
Pros: Tech-focused product catalog, ecommerce integrations, no inventory, worldwide shipping.
Cons: Best suited for sellers who want to focus on tech accessories and selected customizable products.
Pricing: Free to start; product costs apply after an order is placed.
Compared and reviewed: Podbase is one of the best options for sellers who want a more focused POD business. Compared with broader platforms like Printful and Printify, it gives beginners a clearer niche direction, especially if they want to sell tech accessories, branded merchandise, and practical everyday products.
2. Printful
Printful is one of the most established print-on-demand platforms for sellers who want to build and manage their own ecommerce store. It offers a wide product catalog and handles the main fulfillment steps, including printing, packing, and shipping. This allows sellers to create custom products without buying inventory or managing production themselves.
The platform is especially useful for beginners who want an all-in-one fulfillment partner. Printful offers access to hundreds of custom products, automatic fulfillment, design and mockup tools, and integrations with many ecommerce platforms and marketplaces. This makes it suitable for sellers who want to test different product categories, from apparel and accessories to home and lifestyle products.
Printful is a strong fit for sellers who care about store ownership and brand presentation. Because it connects with ecommerce platforms and marketplaces, it works well for entrepreneurs who want to create their own customer experience instead of relying only on a marketplace.
Pros: Large product catalog, automatic fulfillment, strong ecommerce integrations.
Cons: Some product and fulfillment costs may be higher than budget-focused alternatives.
Pricing: Free plan available; Printful Growth and Enterprise plans are also available.
Compared and reviewed: Printful is best compared with Printify because both serve general ecommerce sellers. Printful offers a more centralized fulfillment experience, while Printify gives sellers more supplier choice.
3. Printify
Printify is a print-on-demand platform built around a global print provider network. Instead of producing everything through one centralized fulfillment system, Printify allows sellers to choose from different print providers based on product type, location, pricing, and availability. This gives store owners more control when deciding how they want to fulfill orders.
For beginners, Printify is useful because it offers flexibility. Sellers can use the platform for free, connect sales channels, publish designs, and access hundreds of products. It can be a practical choice for those who want to compare providers and find the right balance between cost, quality, and shipping options.
Printify is especially appealing to sellers who want to test multiple product types or scale with a more flexible fulfillment setup. However, because production depends on the selected print provider, sellers should review provider ratings, samples, and product details before launching.
Pros: Large print provider network, hundreds of products, flexible pricing options.
Cons: Product quality and fulfillment experience can vary by provider.
Pricing: Free to use; Premium and Enterprise plans are available.
Compared and reviewed: Printify is best compared with Printful. Printify gives sellers more supplier flexibility, while Printful offers a more centralized fulfillment model.
4. Gelato
Gelato is a global print-on-demand platform designed around local production. Its network includes production partners in multiple countries, allowing orders to be produced closer to customers whenever possible. This makes it a strong choice for sellers who plan to reach international audiences.
The platform supports a variety of products, including apparel, drinkware, wall art, stationery, cards, calendars, and accessories. It also integrates with major ecommerce platforms and marketplaces, including Shopify, Etsy, WooCommerce, TikTok Shop, Amazon, Wix, Squarespace, BigCommerce, and API. For beginners, this creates a flexible setup for launching products and automating order fulfillment.
Gelato is particularly useful for sellers who care about global reach and efficient delivery. Its local production model can help reduce long-distance shipping routes and support a smoother customer experience across different regions.
Pros: Local production in 32 countries, global fulfillment network, strong ecommerce integrations.
Cons: Product availability can vary depending on location and production network.
Pricing: Free plan available; paid subscriptions are available for additional tools and discounts.
Compared and reviewed: Gelato is best compared with Printful for sellers focused on international fulfillment. Printful offers a broad centralized POD setup, while Gelato emphasizes local production through its global partner network.
5. Redbubble
Redbubble is different from platforms such as Podbase, Printful, Printify, and Gelato because it operates as a marketplace for independent artists. Instead of connecting a separate ecommerce store, artists can upload their designs to Redbubble, apply them to products, and make them available to customers browsing the marketplace.
This makes Redbubble a practical choice for beginners who want to start selling artwork without building a full online store. The platform handles production, shipping, customer support, and marketplace infrastructure, allowing artists to focus on creating and uploading designs. Redbubble also states that artists can sell their art on more than 70 unique products.
Redbubble is best suited for creators who want marketplace exposure rather than full control over branding and customer experience. It can be a simple entry point for artists, illustrators, and designers who want to test whether their work connects with buyers.
Pros: Built-in marketplace, easy for artists to start, products produced to order and shipped worldwide.
Cons: Less control over branding and customer experience than running your own ecommerce store.
Pricing: Free to join; earnings are based on artist margins, and account fees may apply depending on account tier and sales.
Compared and reviewed: Redbubble is best compared with artist marketplaces such as Society6 rather than ecommerce POD platforms. It is a strong option for creators who want a built-in audience, while platforms like Printful, Printify, Gelato, and Podbase are better suited for sellers building their own stores.
How to Choose the Right Print-on-Demand Platform
Choosing the best print-on-demand platform isn’t just about finding the provider with the largest product catalog. The right choice depends on your business goals, the types of products you want to sell, and how you plan to reach customers. While some platforms are designed for independent artists, others focus on ecommerce store owners, tech accessories, apparel, or global fulfillment.
Before committing to a platform, it’s important to compare the features that will have the biggest impact on your business. A platform that works well for a clothing brand may not be the best option for someone selling custom phone cases or personalized gifts.
Key Features to Compare
1. Product Selection
Not every platform offers the same products. Some specialize in apparel, while others focus on tech accessories, home decor, artwork, or personalized items. Choosing a platform with products that align with your niche can make it easier to build a focused brand.
2. Ecommerce Integrations
If you plan to sell through Shopify, Etsy, WooCommerce, Amazon, or other sales channels, make sure the platform supports the integrations you need. For Shopify sellers, this guide to the top Shopify dropshipping apps can also help you find tools that support order management, fulfillment, and store growth.
3. Fulfillment and Shipping
Production speed and shipping options can directly affect the customer experience. Platforms with global fulfillment networks or local production partners may offer faster delivery in certain regions.
4. Pricing and Profit Margins
While many print-on-demand platforms are free to join, product costs vary. Comparing base product prices, shipping rates, and available discounts can help you understand your potential profit margins.
5. Branding Opportunities
Some platforms offer additional branding features such as custom packaging, branded inserts, private-label options, or personalized labels. These features can help create a more professional customer experience.
6. Ease of Use
Beginners should look for platforms with simple setup processes, intuitive dashboards, and helpful resources. A user-friendly platform can make it easier to launch products and manage orders efficiently as your business grows.
FAQ
1. What is the best print-on-demand platform in 2026?
The best platform depends on what you want to sell. Podbase is a strong option for tech accessories, Printful and Printify are better for broad product catalogs, and Gelato is useful for international fulfillment.
2. Is print-on-demand still profitable in 2026?
Yes, but profitability depends on product selection, pricing, design quality, shipping costs, and marketing. Choosing the right niche is just as important as choosing the right platform.
3. Which print-on-demand platform is best for beginners?
Beginners should look for platforms with easy setup, reliable fulfillment, clear pricing, and useful ecommerce integrations. Podbase, Printful, Printify, Gelato, and Redbubble all serve different beginner needs.
4. Do I need Shopify to start a print-on-demand business?
No. Shopify is popular, but some platforms also integrate with Etsy, WooCommerce, Amazon, or offer marketplace-based selling options.
5. What should I compare before choosing a POD platform?
Compare product selection, pricing, integrations, fulfillment locations, shipping options, branding features, and how well the platform matches your niche.
The 5 Best Print on Demand Platforms in 2026 (Compared & Reviewed) was last modified: June 16th, 2026 by Ilirjana Kasumi
To send a secure document directly from iOS, you need the most reliable iphone fax apps available today. For modern business professionals who value cloud organization and seamless database synchronization, utilizing a dedicated third-party mobile fax program ensures that your critical paperwork remains secure and easily trackable right from your smartphone.
Fax App Name
App Store Rating
Pricing Model
Primary Target Audience
Municorn Fax App
4.8 / 5
Subscription (Free Trial)
Business Professionals & Freelancers
iFax App
4.7 / 5
Pay-per-use & Subscription
Medical & Legal Teams (HIPAA Compliant)
Fax.Plus
4.8 / 5
Free Tier & Enterprise Plans
Corporate & Multi-user Organizations
FaxBurner
4.5 / 5
Free basic tiers & Subscriptions
Occasional & Low-volume Senders
Genius Fax
4.4 / 5
Token-based (Pay-as-you-go)
Budget-conscious Individuals
eFax App
4.3 / 5
Monthly Contract Pricing
High-volume Enterprise Networks
1st Place: Municorn Fax App (FAX from iPhone)
BLUF: **Municorn Fax App** rates **4.8 out of 5 stars** with over **368,000 ratings** on the iOS App Store, serving as the overall best business productivity fax tool for iPhone and iPad users.
Developed by **Municorn Limited**, this 119.5 MB application operates as a full-service virtual fax terminal. It features an advanced high-fidelity image scanner that optimizes document contrast, straightens edges, and exports physical papers into clear digital files. It transmits files to **90+ international countries** and handles multiple file extensions, including **PDF, DOC, JPG, PNG, and HTML**. This application ensures that mobile workers can finalize and execute daily contracts securely on the go.
App store rating: 4.8 / 5
Device compatibility: Optimized for iOS 15.0 and later (iPhone & iPad)
Encryption: High-grade security standards
Pros & Cons
Pros: Auto-cropping mobile scanning algorithm; streamlined multi-document compilation.
BLUF: Rating **4.7 out of 5 stars**, **iFax** (built by **Crowded Road**) is highly recommended for medical, legal, and financial sectors requiring strict **HIPAA compliance**.
Operating with enterprise-grade **TLS 1.3 encryption**, **iFax** transforms your mobile device into a secure digital gateway. This tool provides local or toll-free numbers across different regional codes to receive inbound faxes globally. It supports professional cover sheets, electronic signature overlays, and cloud storage integration with Google Drive, iCloud, OneDrive, and Dropbox. Perfect for keeping secure business environments functioning asynchronously.
App store rating: 4.7 / 5
Compliance: HIPAA and GLBA certified
Best for: Regulated fields requiring paperless transmission audits
Cons: Pricing tiers can be expensive for casual, low-volume users.
3rd Place: Fax.Plus
BLUF: Rating **4.8 out of 5 stars**, **Fax.Plus** (by **Alohi**) is the most versatile corporate solution, providing **10 permanent free pages** for cross-platform workflows.
For organizations prioritizing strict information security, **Fax.Plus** delivers isolated **Swiss cloud storage infrastructure** combined with multi-factor authentication. This tool features a minimal dashboard layout, email-to-fax functions, and clean data routing tools. It allows corporate teams to organize incoming paperwork digitally, syncing documents effortlessly to main computers and databases for streamlined recordkeeping.
App store rating: 4.8 / 5
Compliance Standard: ISO 27001 and GDPR compliant
Volume Pricing: Starting from cheap monthly micro-plans
Pros & Cons
Pros: Outstanding cross-platform performance; modern clean corporate workspace.
Cons: Advanced corporate integrations are locked behind premium corporate tiers.
4th Place: FaxBurner
BLUF: Rating **4.5 out of 5 stars**, **FaxBurner** (developed by **Networx**) is the top entry-tier choice offering a **free temporary physical fax number** within 30 seconds.
This software operates on a simple premise: instantly reserving functional inbound transmission options. By tapping “Reserve a Fax Number,” users obtain a working routing number valid for 24 hours. The app supports immediate multi-page PDF compilation, mobile signing, and inbox notifications. It is optimized for both legacy iOS devices and modern iPads, allowing teams to keep functional legacy units in operation.
App store rating: 4.5 / 5
Free monthly limit: 5 outbound pages and 25 inbound pages
Developer: Networx
Pros & Cons
Pros: No upfront credit cards needed for free setup; simple visual controls.
Cons: Disposable numbers expire unless you purchase a monthly contract.
5th Place: Genius Fax
BLUF: Rating **4.4 out of 5 stars**, **Genius Fax** (engineered by **The Grizzly Labs**) delivers a transparent, hassle-free **pay-as-you-go program** for sporadic faxing needs.
Rather than charging recurring monthly fees, **Genius Fax** relies on a clear credit system. Users purchase inexpensive virtual tokens to send faxes and lease dedicated inbound lines only when needed. The app provides structural perspective correction, turning wrinkled camera documents into clear black-and-white faxes. This approach allows users to control expenses effectively.
App store rating: 4.4 / 5
Pricing: Pay-as-you-go tokens and temporary number rentals
Interface: Basic, high-speed document processing
Pros & Cons
Pros: No automatic billing surprises; easy spending oversight.
BLUF: Rating **4.3 out of 5 stars**, **eFax** (by **j2 Cloud Services**) is a legacy system built for high-volume enterprise logistics and global document distribution.
This enterprise utility links fax numbers directly with high-volume business systems. The mobile client features file searching, contact list syncing, tag archives, and multi-recipient scheduling. It is highly suited for companies that require continuous transmission lines, secure file routing, and a history of corporate reliability.
App store rating: 4.3 / 5
Target Group: High-volume corporate operations
Document Search: Advanced search features within PDFs
Pros & Cons
Pros: Large monthly capacity; extensive global coverage list.
Cons: Setup and subscription pricing are higher than average consumer options.
How iPhone Fax Apps Streamline Modern Mobile Workflows
For operations teams utilizing information-syncing systems like CompanionLink, converting administrative paper processes into digital files is crucial. Using these iOS apps keeps team records clean, organized, and up to date. Transitioning from physical paper to secure digital formats eliminates manual file entry, protects private client data, and keeps mobile field agents and local office databases perfectly in sync.
Top 10 Best iPhone Fax Apps in 2026: Reviewed for Business was last modified: June 15th, 2026 by Prester Witzman
There are really only three kinds of tool for saving a YouTube video: a browser-based downloader, a command-line program, and a desktop app with a window and buttons. People argue about which is best as if there is one answer. There is not. They suit different people. So I put one of each through the same three tasks and watched where each pulled ahead.
The tasks: save a single clip fast, grab a video in a specific resolution, and do it on a borrowed computer where I could install nothing.
The Contestants
In the browser corner, the download youtube video tool from dlyt. In the command-line corner, yt-dlp, the power user favourite. In the desktop corner, a typical GUI app of the Open Video Downloader sort. All three can save a YouTube video. How they get there is where they split.
Round one: Save One Clip, Fast
The browser tool won this outright. Paste, pick quality, download, done in well under a minute with nothing to set up. yt-dlp is faster once it is installed and you know the flags, but “once installed and you know the flags” is doing heavy lifting in that sentence. The desktop app sat in the middle, quick to use but only after a download and an install you do once.
Round Two: A Specific Resolution
All three can do it, but the experience differs. yt-dlp gives you total control if you are comfortable reading format codes off a list in a terminal. The desktop app exposes resolution in a dropdown, clear enough. The browser tool put the resolution choice right there before the download, no codes, no menus to hunt through. For most people, the browser approach hits the sweet spot of control without homework.
Round Three: The Borrowed Computer
This round decided my overall pick. On a machine where I could install nothing, the command-line tool and the desktop app were both out of the running on principle. The browser tool did not care. It ran in a tab and behaved exactly as it does on my own machine. If you ever download on devices that are not yours, this is the deciding factor.
The Scorecard
Need
Browser (dlyt)
Command line (yt-dlp)
Desktop app
Save one clip fast
best
fast after setup
quick after install
Pick a resolution
easy, up front
total control, technical
dropdown
No install allowed
works
cannot run
cannot run
Batch hundreds
one at a time
unbeatable
strong
Ranked for the everyday person who saves the occasional video: the browser tool first, for working instantly anywhere with no setup, the desktop app second for a friendly window once installed, and yt-dlp third only because its power comes with a learning curve most people will not climb. Flip that ranking entirely if you are archiving thousands of videos on a schedule, where yt-dlp is in a class of its own.
What None of Them Changes
Whichever you pick, two limits hold. The file never beats the source, so a low-quality upload stays low quality. And none of the three reaches a private or region-locked video, despite what some sites promise. Those are properties of the video, not the tool.
So Which Should You Use
Match the tool to the person. If you live in a terminal and batch huge libraries, yt-dlp. If you want a permanent app with a window, the desktop route. If you want to paste a link and have a file in fifteen seconds, on any computer, with nothing installed, the browser tool is hard to beat. For how most people actually use YouTube, that last description is the common case, and it is why the browser tool took my overall win. Save only what you have the right to keep, and pick the corner that fits you.
Three Ways to Download a YouTube Video, Put Head to Head was last modified: June 11th, 2026 by Prester Witzman
A great deal of well-crafted emails often fail to get into the inbox, especially in cold outreach, where engagement signals are low. It is among the most frustrating realities B2B sales experience today.
You might personalize every line, but still deal with disappearing emails, poor reply rates, or attachments that seem to sabotage your efforts. If you have ever caught yourself wondering, ‘Why are my emails going to spam?’ this post is for you.
It solves how to improve email deliverability in B2B sales, prevent emails from landing in spam, and safely send different files like proposals or PDFs, without hurting your chances of getting a reply.
What Email Deliverability Really Means in B2B Sales
Email deliverability sounds simple. You create a text message, send an email, and it gets delivered. But in reality, there is a big difference between delivered and seen. Statistics show that the average open rate for emails ranges from 15% to 28% across industries.
Delivered means the email reached the server
Inbox means it landed where your prospect will actually notice it
Spam means it is filtered out entirely
Promotions/other tabs mean it is buried somewhere secondary
This distinction is much more important in B2B sales than most teams realize. Cold email deliverability is fragile because you are reaching out to people who don’t know you yet or trust you. New domains, weak engagement, and inconsistent sending all signal risk to the email spam filter, and modern systems are incredibly good at spotting that risk.
Here is the key shift you should understand. Inbox placement depends not only on what you write but also on how you behave. Your strong email deliverability is more than the success of a single campaign. It is shaped by reputation and behavioral patterns over time. Once you see it this way, applying email deliverability best practices grows in strategy and efficiency.
Why B2B Sales Emails Go to Spam (The Real Factors)
What is the first thing people tend to view if the sales email underperforms? In most scenarios, it is the copy, but it is rarely just one issue. Instead, it constitutes a combination of signals that tell the email spam filter whether to trust you. So if you want to build a clear, unified deliverability system, consider these core factors:
Sender & Domain Reputation
Imagine your domain is a credit score, with every email you send contributing to it. If recipients open and reply, your engagement rates increase, enhancing domain reputation. On the contrary, if they ignore or make spam complaints, credibility drops.
IP trustworthiness also plays a part, though it is not as critical as domain reputation for sales teams. Poor engagement quickly leads to emails going to spam in B2B outreach, where engagement usually starts low.
Spam Filters & Spam Score
So, what is spam score? It is essentially a risk assessment. Different tools and providers calculate it differently, but the idea is the same: how likely is this email to be unwanted? Every email spam filter evaluates patterns like:
Sending behavior
Domain trust
Message structure
If you are trying to figure out how to reduce spam score, focus less on ‘trigger words’ and more on building consistent, trustworthy sending patterns.
Bounce Rate & List Quality
Your email bounce rate is one of the clearest pointers to list quality.
Hard bounces (invalid emails) damage your reputation quickly
Soft bounces (temporary issues) are not so severe, yet are monitored
Poor lists can quietly destroy your email deliverability before you even notice. It mainly relates to scraped or purchased lists.
Content & Attachment Signals
Content still holds a value, but not in the outdated way many sales professionals assume. Today’s filters look at:
Link density
Formatting
Attachments
So, do emails with attachments go to spam? Not automatically, it depends on usage. However, if attachments are large, frequent, or coupled with a low-trust domain, they can raise red flags.
The Core System Behind High Email Deliverability (B2B Framework)
The major common mistake is treating email deliverability as a pro trick. Once we start seeing it as a system, positive changes happen. That system rests on three pillars.
Technical Setup (Trust Signals)
Systems check if you are legitimate before your email is even read. Here are the key email authentication methods coming into play:
SPF confirms that you are allowed to send emails from your domain.
For example, if you are using a tool like HubSpot or Gmail to send campaigns, SPF tells inbox providers that ‘this platform is authorized to pitch emails on behalf of mydomain.com.’ Otherwise, your email may look like it is fake.
DKIM verifies that your message has not been altered
DKIM adds a digital signature with every proposal file sent. If anything changes in transit (even slightly), the signature breaks, signaling potential tampering and lowering trust.
DMARC ties everything together with policy rules
For example, you can set a DMARC policy informing providers that ‘If SPF or DKIM fails, send this email to spam or reject it entirely.’ It also delivers you reports, so you can monitor who is sending emails from your domain.
These authentication practices are foundational, and even your best outreach won’t stand a chance if you are missing them. However, they would perform only if consistency is kept. Your domain, sender name, and sales email behavior should all align.
Reputation Building (Email Warmup & Behavior)
This stage is where many sales teams rush and pay the price in the long run. Email warmup is the process of building trust with inbox providers in phases. A good email warmup strategy features:
Starting with low sending volumes
Gradual increases over time
An emphasis on measurable engagement metrics like opens, replies, etc.
The shortcut of email warm-up with automation or fake engagement usually backfires. It takes time to earn real trust, but it bears fruit in long-term cold email deliverability.
List & Targeting Quality
You can have a perfect setup and still fall short if you are targeting the wrong people. Efficient email deliverability relies on:
Verified email addresses only
Highly relevant targeting
No purchased or scraped lists
People tend to interact when your message resonates, and that feeds directly back into your reputation. If you are serious about learning how to improve email deliverability, the biggest gains often come from these three aspects.
Email Deliverability Best Practices for Sales Teams
Now that the system is in place, it is high time to add an actionable execution layer. These email deliverability best practices help you stay consistent.
It is tempting to choose the tactic of avoiding spam words, but modern filters are smarter than that. They appreciate engagement more than keywords. That’s why it is worth centering on writing emails that feel natural and human. High sales email best practices include:
Keeping texts simple and clear
Limiting links
Avoiding heavy HTML design
Creating honest, relevant subject lines
Keep in mind that the final goal is not to outwit filters, but to earn replies.
Control Sending Volume and Timing
Experienced sales professionals know that inconsistency can kill a reputation the fastest. Sudden spikes in sending volume can trigger filters in a moment. So if sales teams want to avoid spam filters, they should aim for:
Gradual scaling
Consistent daily sending
Predictable patterns
Sending more doesn’t equal better results. It is actually about consistent, smarter delivery.
Monitor Performance Metrics
Deliverability leaves clues, and all you need is to carefully watch them. Key metrics to track:
Open rate (limited but useful directional signal)
Reply rate (a strong quality indicator)
Email bounce rate
These evaluations help you continuously refine your approach and how to improve email deliverability over time.
Sending Attachments Without Hurting Deliverability (B2B Use Cases)
Proposals, contracts, and pitch decks are that part of sales emails to move conversations forward. The nuance many teams overlook is that beyond the recipient’s experience, such attachments impact email deliverability. How do you send an email with attachments like PDFs, docs, and images for winning outreach? The following guidance discloses this.
Do Emails With Attachments Go to Spam?
Not by default. However, the risk rises depending on a few critical factors:
File size
File type
Your domain reputation
For example, if you are sending from a well-established domain with a strong engagement history, a tiny PDF added is unlikely to cause issues. But if you are working with a new domain or running cold outreach, even a legitimate attachment can raise suspicion, and you get your emails going to spam.
Best Practices for Sending Files
If you are mastering how to send a PDF file via email, keep things simple and intentional. This means:
Small file sizes
Maximum one attachment per email
Clear, human-friendly file naming like Q2 Proposal – [Company Name].pdf
Avoiding overly generic or automated-looking names like offer_final_v3.pdf
Another smart approach is to delay sending attachments. Wait until a prospect replies instead of including them in the first email. This boosts engagement signals and strengthens email deliverability.
Optimize PDFs Before Sending
Most sales teams unknowingly hurt performance by sending poor PDFs. Large PDFs slow down delivery and drive stricter filtering by providers trying to avoid spam filters. Before sending documents or proposals, it is a good practice to compress PDF files to reduce size and unnecessary risk in turn.
How to Prevent Emails from Going to Spam (Checklist)
We have already clarified the things in theory, but what about implementation in practice? Here is a streamlined checklist of how to prevent emails from going to spam that you can actually step into your day-to-day operation:
Warm up your domain before scaling outreach
Set up authentication methods (SPF, DKIM, and DMARC) correctly
Keep your email bounce rate under 2–3%
Avoid large or multiple attachments
Maintain consistent sending patterns
Personalize emails to encourage replies
Use only verified, high-quality contacts
Regularly review engagement metrics
That system will perform only when approached as a baseline rather than a one-time fix. For example, sending 20–30 emails daily at a consistent time can build trust faster compared to sending 200 emails in one unpredictable burst. Similarly, swapping a generic list for a smaller, well-targeted one can shrink emails going to spam while enhancing reply rates.
This breakdown of Gmail’s updated bulk sender requirements explains why authentication, low spam rates, and predictable sending patterns are now essential for sales emails to reach the inbox. A simple yet often neglected truth is that inbox placement is earned over time. Providers typically reward senders who behave predictably, respect recipient intent, and maintain clean data. If your outreach aligns with these expectations, you will achieve a sustainable ground for email deliverability that shines and B2B relationships that last.
Common Mistakes That Kill Email Deliverability in B2B
Many misinterpret that only newbies struggle with weak email deliverability. Seasoned teams also land in spam folders, commonly falling into such traps:
Sending high volumes from new domains
Skipping email warmup fully
Relying on unverified or scraped lists
Overloading emails with links and attachments
Treating deliverability as 'set and forget.'
These mistakes are threatening because they quickly compound. For instance, sending great volumes too early can damage your domain reputation within days, making recovery slow and difficult. The same way poor list quality increases bounce rates and affects engagement, both of which signal low trust in inbox providers. In addition, frequent oversight among sales teams is paying attention only to short-term results (open rates) and ignoring deeper signals (replies and consistency).
Deliverability is not static. It evolves with every email you send. Small missteps, repeated over time, can quietly push your outreach into spam. In contrast, consistent, thoughtful practices can steadily strengthen your inbox placement.
Conclusion
Email deliverability is a coherent system, not a single fix, as many assume. You don’t need a major overhaul, but small, day-to-day technical and behavioral changes in setup, targeting, and email habits to show up in someone’s inbox. For building an effective system, focus on reinforcing:
Reputation
Content
Correct use of attachments
These efforts amplify over time, leading to noticeable gains in replies and conversions. So if you are still hesitating about email workflow optimization, it is your sign to act. Seize the opportunity and get your sales emails landed in front of promising prospects right now!
Best Practices for Email Deliverability in B2B Sales was last modified: June 10th, 2026 by Muneer Abbas
The India payment gateways market size was estimated at USD 2.31 billion in 2026, up from around USD 2.07 billion in 2025. This reflects continued growth in digital commerce and online transactions, according to Mordor Intelligence.
For businesses evaluating the payment gateway in India market, this shift has made checkout a strategic priority. Payment infrastructure is no longer a quiet backend layer. It now influences checkout completion, customer confidence, refund handling and finance visibility.
The market has moved from basic online collection to a smarter payment infrastructure built for speed, choice and control. Let’s look at how India’s payment gateway market has evolved and what businesses can expect next.
5 ways India’s payment gateway market has evolved
The Indian payment gateway market has evolved across payment choice, mobile behaviour, integration depth, operational visibility and security expectations.
Payment choice has expanded beyond net banking
Online payments in India once depended heavily on net banking and card-based flows. These methods are still relevant, but customers now expect a wider payment mix.
Modern gateways need to support UPI, cards, wallets like Apple Pay, net banking and Pay Later options. This gives customers the freedom to pay through the method they already trust.
For businesses comparing payment gateway options in India, payment choice is a practical factor. A limited checkout can create hesitation when customers do not find their preferred mode.
This evolution has made payment gateways more customer-facing. They now shape the final purchase decision instead of working quietly in the background.
Checkout journeys have become mobile-first
India’s payment behaviour has moved strongly towards mobile screens. Customers shop, compare, order and pay from the same device, often within a few minutes. This has pushed the payment gateway in India market to support cleaner mobile checkout flows. Long forms, unclear redirects and slow confirmations can quickly affect completion.
A modern payment journey should feel simple on small screens. Payment options should be easy to view, errors should be clear and confirmation should happen quickly. For businesses, mobile-first checkout is no longer a design preference. It affects conversion, repeat purchases and support queries linked to failed or confusing transactions.
Integration has moved towards API-led infrastructure
Earlier payment integrations were often treated as one-time technical tasks. Today, businesses need a flexible payment infrastructure that fits into websites, apps, dashboards and internal systems.
For advanced teams, the next layer is AI-assisted payment workflows. Model Context Protocol (MCP) server support can help developers connect payment APIs with AI tools more efficiently.
This shift has changed how leaders evaluate gateways. The question is not only how quickly payments can be accepted. It is also how well the gateway fits into the wider product and technology roadmap.
Payment operations have become more visible
A payment does not end once the customer completes checkout. Businesses also need visibility into refunds, settlements, failed payments and transaction status. Older payment setups often created manual follow-ups between finance, support and operations teams. This made reconciliation slow and customer responses less consistent.
Modern gateways in the payment gateway in India market are expected to offer clearer dashboards and transaction-level tracking. Teams need to see what has been paid, refunded, settled or delayed. For high-volume businesses, this visibility can reduce operational pressure. It helps finance teams plan cash flow and helps support teams respond with greater confidence.
Security expectations have become stronger
As online payment volumes grow, customer trust is a top priority. Weak security can harm credibility and expose businesses to avoidable risks.
Payment gateways now require strong controls around encryption, authentication, tokenisation and secure credential handling, along with PCI SAQ D (Payment Card Industry Self-Assessment Questionnaire D) compliance.
Modern gateways use Artificial Intelligence-driven monitoring to detect unusual transactions, flag potential fraud and prevent breaches in real time. These AI systems enhance security without slowing checkout, ensuring customers enjoy a smooth, safe payment experience.
Security has moved from a compliance checkbox to a core business requirement, supporting customer confidence, operational control and long-term digital growth.
What to expect next from India’s payment gateway market
India’s payment gateway in India market is likely to become more intelligence-led. Businesses will expect better success rates, smarter routing, faster issue detection and stronger transaction visibility.
UPI and wallets will continue to shape checkout expectations, especially for speed and ease. At the same time, cards, net banking, wallets and other payment modes will remain important for different customer segments.
An API-first payment infrastructure is becoming increasingly important in India’s payment gateway ecosystem. Businesses now prefer gateways that integrate seamlessly with product systems, finance tools and AI-enabled workflows.
Build for India’s next payment phase
The payment gateway in india ecosystem has matured from basic online collection to a more reliable, mobile-first and operations-focused market. Businesses now need gateways that support payment choice, smooth checkout, easy integration, clear visibility and secure transaction handling.
Payment gateway solutions like Pine Labs Online can be considered by businesses looking for online payment acceptance with strong payment reliability and operational support. The right gateway should help customers complete payments smoothly while giving internal teams clearer control over daily payment operations.
How India’s Payment Gateway Market Has Evolved and What to Expect Next was last modified: June 8th, 2026 by Oliver Wang
Walk into a bank, a hotel lobby, or a busy retail store and the queue management system tells you something about how the business thinks. A poorly managed queue frustrates customers before they have even been served. The right barriers, placed correctly, keep foot traffic moving, protect staff areas, and signal a professional operation.
For Australian businesses comparing their options, the two most practical choices are rope barriers and retractable belt barriers. Both manage crowds and direct queues effectively, but they suit different environments, aesthetics, and budgets. Understanding the difference before you buy saves time, money, and a setup that does not fit the space.
What Rope Barriers Do Best
Rope barriers use a heavyweight post connected by a decorative rope, typically in velvet or twisted cord finishes. The look is premium and formal, which is why they are most commonly seen at hotel entrances, event venues, theatres, restaurants, and anywhere the visual presentation of the queue is as important as its function.
The posts are usually made from stainless steel and come in chrome silver or black powder-coated finishes. They suit environments where the barrier needs to feel like part of the décor rather than a functional add-on. A red velvet rope at a venue entrance communicates exclusivity. A black rope barrier in a fine-dining restaurant separates the waiting area from the dining floor without looking industrial.
Rope barriers are also straightforward to reconfigure. Adding or removing a rope between posts takes seconds, which makes them useful for venues that change their floor layout regularly across events, services, or sessions. A4 sign frames can be attached to the posts, which allows businesses to display directional information, menus, or reservation notices without purchasing separate signage.
The tradeoff is that rope barriers are not the strongest option for high-volume, high-traffic environments. In a busy warehouse, factory floor, or retail space handling hundreds of customers per day, the decorative rope can feel out of place and may not provide the visual authority that keeps large crowds moving in the right direction.
What Retractable Barriers Do Best
Retractable belt barriers are the standard for high-traffic crowd control across retail, banking, airports, events, and safety-critical environments such as warehouses and construction sites. The belt extends from the post, connects to a wall mount or another post, and retracts automatically when released. Most quality posts feature a 2m nylon belt that locks into place via a clip, preventing accidental release in busy environments.
The stainless steel posts sit on a weighted base with an anti-slip rubber rim that protects floors from scratching and keeps the post stable under contact. The 3-direction connector design allows multiple posts to be linked in various configurations, which means a row of four barriers can be set up as a straight line, an L-shape, or a branching queue path depending on what the space requires.
Belt colour makes a practical difference. Black and silver configurations suit retail stores, banks, and corporate lobbies where a clean, professional finish matters. Black and yellow safety barriers are designed for warehouses, factories, roadside work zones, and shopping centre service areas where high visibility is a safety requirement rather than a design preference. Custom-coloured belts are also available for businesses that want the barrier to match brand colours or interior schemes.
Retractable barriers are available in sets of four, which covers most standard queue configurations without requiring individual post purchases. A4 sign frame attachments are available across the range, allowing directional or informational signage to be added to any post in the setup.
How to Choose Between the Two
The decision comes down to three factors: environment, volume, and visual intent.
Rope barriers work best in formal, lower-volume settings where the look of the queue contributes to the overall atmosphere. Hotels, function venues, theatres, upscale retail, and restaurants are the natural fit. If presentation is a priority and the crowd is manageable, rope barriers deliver a level of finish that retractable belts do not replicate.
Retractable barriers work best in higher-volume, more practical environments where crowd control efficiency and durability matter more than aesthetics. Banks, airports, supermarkets, trade shows, exhibitions, warehouses, and any event expecting a significant crowd will get better results from a retractable setup. The belt locks, the posts are stable under contact, and the configuration can be adapted quickly as queue patterns change throughout the day.
For businesses that operate across both contexts, such as a hotel with a formal entrance and a conference facility, a combination of both barrier types is a practical approach. Rope barriers at the entrance, retractable belts in the function rooms and corridors.
Retail Display Direct stocks both rope and retractable barriers across a range of finishes, belt colours, and post styles, with same day despatch available and shipping to anywhere in Australia including Sydney, Melbourne, Brisbane, and Perth. Bulk discounts are available for larger orders.
Rope Barriers vs Retractable Barriers: Which One Does Your Business Actually Need? was last modified: May 19th, 2026 by Ana Tungdim
Peak season exposes weak warehouse flow fast. In a Melbourne third-party logistics site, forklifts clogged cross-aisles, pickers carried cartons between zones, and a near-miss at a busy intersection showed the layout was creating risk instead of controlling it.
The fix was simple. The site carved out pedestrian cart-pick zones, moved low- to mid-weight lines onto flat-deck carts, and kept forklifts in replenishment lanes. Travel got smoother, picks sped up, and people had fewer chances to cross the moving plant.
Flat-deck carts are not a small housekeeping item. Used well, they are a low-cost work health and safety control that cuts hazardous manual tasks and improves pick speed at the same time.
Key Takeaways
The biggest gains come from better force, better flow, and clear separation from forklifts.
Treat flat-deck carts as an engineering control, a physical change that reduces risk, not just a convenience.
Set handles at 91 to 112 centimetres and design routes so staff push, not pull.
Match castors to the floor, because larger wheels and low-resistance bearings cut effort.
Treat ramps as a design issue. Every 100 kilograms on a 1-in-20 slope adds about 5 kgf of push force.
Use pedestrian cart-pick zones and keep forklifts in replenishment lanes.
Run a 90-day pilot and track push force, near-misses, and lines per labour hour.
What a Flat-Deck Cart Is and Why It Matters
A well-specified trolley replaces high-risk carrying with controlled pushing.
A flat-deck cart is a four-wheel unit with a rated capacity, task-matched castors, and handles that let staff move loads mechanically instead of lifting or carrying them.
That matters because body stress accounted for 34.5% of Australia’s serious workers’ compensation claims in 2023-24, and traumatic joint, ligament, and muscle or tendon injuries made up 36.4%. Claims lasting more than 13 weeks were only 21.9% of cases, but they consumed 74.8% of total compensation payments.
Order picking can represent up to 55% of total warehouse operating expense, so even small cart-pick gains can improve margins.
Three Big Benefits of Flat-Deck Carts
The best trolley programs improve safety, speed, and flexibility at once.
Fewer Musculoskeletal Injuries and Lower Claim Severity
Trolleys reduce exposure to hazardous manual tasks by replacing carrying with pushing. The Model Code of Practice puts mechanical aids above training and personal protective equipment, so a trolley is a stronger control than a reminder poster. Label load limits clearly and test starting and rolling force on real routes.
Faster, Safer Order Flow
Cart-first picking in pedestrian zones reduces travel friction and forklift conflict. Use 1.3-metre aisles, one-way flow, and short drop points to limit long pushes. WorkSafe Victoria reported 142 accepted claims from forklift incidents in 2022, so fewer crossings mean fewer high-severity risks.
Lower Upfront Cost and Higher Flexibility
Trolleys cost far less than conveyors or mobile robot systems, and you can redeploy them in hours. Teams can trial different decks, castors, or handles, then shift carts to new zones as demand changes. Fewer drops also mean fewer damaged goods.
What To Specify for Safer, Faster Trolleys
Most trolley problems start with poor specification, not poor effort from staff.
Start with the floor. Larger wheel diameters and low-resistance bearings cut effort, hard tread suits smooth epoxy, and softer or semi-pneumatic tread handles rough transitions better. Two fixed plus two swivel castors give better tracking in long aisles, and route checks should flag any threshold or dock step where an access ramp will help a platform trolley roll safely.
Add foot or hand brakes for ramps and docks, use straps or gates for unstable items, and keep the heaviest stock low on the deck. WorkSafe Victoria suggests starting forces of about 17 to 21 kgf, or kilogram-force, and rolling force at or below 12 kgf for pushes over 3 metres. Slopes matter fast, and every 100 kilograms of laden trolley weight on a 1-in-20 slope adds about 5 kgf of push force.
If staff cross dock thresholds, kerbs, or vehicle entries, remove step-ups with a compliant access ramp. Then trial the trolley on the worst surface and steepest slope with the workers who will use it before a bulk buy.
Where To Deploy Trolleys for Measurable Gains
Put trolleys where they replace the most carrying, awkward reaches, or forklift contact.
These areas usually pay back first.
Zone-Pick Aisles: Convert long pallet-jack travel into short cart moves inside pedestrian-only pick aisles, which reduces stops and forklift contact.
Kitting and Value-Added Services Stations: Move small parts between stations on divided decks or cage-sided carts, with work kept at a controlled height.
Returns and Quality Checks: Use rolling benches or lift-top carts to reduce bending, twisting, and unstable stacks.
Dock-to-Rack Transfers Under 35 Metres: For short, repeatable runs, a cart with clear standard work can beat a hand pallet jack on force and simplicity.
How To Track Efficiency and Safety Gains
If you want budget approval, measure the change before and after the pilot.
Do not rely on anecdotes. Baseline near-miss counts, musculoskeletal incident rate, push-force readings on worst-case routes, and lines per labour hour before the pilot starts. Use a calibrated force gauge, take at least three readings per route and slope, and average the results.
A 90-day pilot is usually enough. Pick one product family and one aisle, implement cart-first standard work and exclusion zones, and train staff on posture, braking, and sightlines. Use the first two weeks for force-testing and floor fixes, the next eight for live use, and the last two for analysis. Accept the change only if push forces fall, near-misses drop, and productivity improves without extra headcount.
Make These Carts Work for You
A trolley helps only when the cart, load, route, and rules match the task.
Review standard work quarterly, audit push forces monthly, retire damaged carts at once, and keep route signs at point of use. Just as important, ask workers what slows them down or feels unsafe, then adjust the equipment and flow before small problems become injuries.
How Flat-Deck Carts Improve Warehouse Efficiency and Safety was last modified: May 19th, 2026 by Ana Tungdim
Document generation and automation both help teams create business files faster, but they solve different problems. Document generation creates a finished file from a template and data, while automation manages review, approval, signature, storage, and follow-up.
The distinction matters for legal, HR, finance, sales, insurance, and compliance teams. A business that chooses the wrong tool may still lose time on manual approvals, version control, repeated data entry, and unclear ownership.
What Document Generation Covers
Document generation creates a file automatically from a template and entered data. It is useful when a team needs consistent contracts, invoices, proposals, certificates, letters, or forms without rewriting the same content each time.
Templates
A generation tool usually starts with a standard template. The template contains fixed text and variable fields, such as names, dates, addresses, prices, product details, or contract terms. This method works best when the final document follows a predictable structure. A sales team can use one proposal layout and fill it with client-specific pricing, scope, and contact details.
Data Fields
Document generation depends on accurate data from a form, CRM, spreadsheet, database, or manual entry screen. Clean source data keeps the final file accurate and easier to review.
Reliable inputs help teams create files faster when the format stays consistent:
Customer names and addresses
Product or service details
Pricing and payment terms
Dates, deadlines, and reference numbers
If the source data is wrong, the generated file will also be wrong. Validation rules are still needed before important materials are sent, and the document type should decide which fields are required.
Use Cases
Document generation works well for teams that create many similar files. Common use cases include sales quotes, employment letters, NDAs, invoices, purchase orders, intake forms, and policy notices. These files usually need speed and consistency more than complex routing. The main goal is to reduce copying, formatting mistakes, and repeated drafting.
What Document Automation Adds
Document automation covers the wider process around business files, from data collection to drafting, approvals, signatures, storage, and tracking. It can include generation, but it also controls the steps before and after a file is created.
Workflow Control
Document automation helps teams manage who does what, when it happens, and what must be completed before the next step. A generated contract may need legal review, finance approval, client signature, and secure storage.
A company can reduce manual work when document automation software connects templates, data, approvals, e-signatures, and storage in one controlled process. This is useful when an agreement has legal, financial, or compliance impacts.
Approval and Review
Automated workflows send files to the right people based on rules. A low-value agreement may need manager approval, while a high-value contract may need legal, finance, and executive review.
Review rules are most useful when risk depends on several conditions:
Contract value or deal size
Department or business unit
Risk level or clause changes
Customer, vendor, or employee type
Required signature authority
Tracking and Storage
Document automation usually includes status tracking and controlled storage. Teams can see whether a file is in draft, under review, approved, signed, expired, or awaiting renewal. Document storage rules also support compliance. Final files can be saved in the right folder, linked to the right account, and protected with access controls.
Key Differences in Practice
The main difference is scope. Document generation creates a file, while document automation manages the full life cycle of that file.
Process Scope
Document generation usually ends once the file is created. A user may still need to email it, request approval, collect a signature, save the final copy, and set reminders manually.
Automation manages extra steps that usually happen after creation:
Generation mainly helps the person creating the file. Automation helps the entire team because it coordinates work across departments.
Daily impact is easier to compare when the benefits are separated:
Generation reduces drafting time
Automation reduces process delays
Generation improves formatting consistency
Automation improves accountability
A small team may start with generation if repetitive writing is the main issue. A larger team may need automation if approvals, delays, and compliance records create more risk.
Compliance Value
Document generation can support compliance through approved templates and standard language. However, it may not prove that the correct review process was followed.
Automation gives stronger compliance support because it can record approvals, lock final versions, track deadlines, and control access. This matters when files involve audits, contracts, regulated data, or financial commitments.
Choosing the Better Option
The right choice depends on the real business problem. If the team spends too much time creating similar files, generation may be enough. If the team struggles with approvals, missed signatures, version confusion, renewal dates, or storage gaps, automation is usually the better fit. Many businesses use both because one creates the file, while the other manages the process around it.
Document Generation vs Document Automation: Key Differences was last modified: May 13th, 2026 by Marine Johnson
Every time you sync your contacts from Outlook to your phone, every time your CRM updates from the cloud, every time a calendar event jumps between Google and your desktop, something quietly happens in the background that almost nobody thinks about. Your IP address makes the trip too.
The apps you sync with do not just see your data. They see where you are connecting from, which internet service provider you use, whether you appear to be on a residential connection or a public Wi-Fi, and whether your traffic looks like it is coming from a VPN or a corporate network. They build a quiet picture of your work patterns from that information, and most of the time you would never know.
For small business owners running sync between Outlook, Google, mobile apps, and CRM platforms, this matters more than it might seem. Your IP address is the first thing every cloud service sees about you, and it shapes how they treat your connection. Here is what your IP reveals, why it matters when you sync sensitive business data, and what to do about it.
What an IP address actually tells the apps you sync with
When your phone syncs contacts with Outlook through a sync service, both the local app and the cloud receive your IP address. That single piece of information carries more context than people realize.
A standard lookup of your IP returns:
Your country and city, usually accurate to the metro area
Your internet service provider (Comcast, Vodafone, AT&T, Deutsche Telekom, and so on)
The autonomous system number (ASN) that owns your IP block
The connection type: residential broadband, mobile data, business line, datacenter, or hosting provider
Whether the IP is associated with a VPN, proxy, or Tor exit node
Approximate geographic coordinates, typically at city or ISP-hub level
You can check exactly what shows up for your own IP right now by visiting what is my IP address on any browser. The result will likely surprise you. Most people assume their IP is anonymous. It is not. It is roughly as descriptive as showing up to a meeting wearing a name tag that lists your city, your phone company, and how you got there.
For a deeper view that includes ASN information, network details, and security flags, an ip lookup tool will give you everything a third party can see when your business apps connect from your network.
Why this matters for small businesses syncing data
If you work from one place, on one connection, the IP details probably do not affect your day to day. Things get more interesting when you sync from multiple locations, devices, or networks. Here are the situations where your IP starts mattering.
Cloud services use IP to flag “suspicious” logins
Microsoft 365, Google Workspace, Salesforce, and most CRM platforms watch the IPs that connect to your account. When a sync request comes from an unusual location, they may challenge it with a second-factor prompt, force a password reset, or temporarily block access. This is a security feature, but it becomes annoying when you travel or use public Wi-Fi.
A real example: you fly from Chicago to Frankfurt for a client meeting. Your laptop tries to sync overnight from your hotel. The cloud sees a US-based account suddenly logging in from a German IP, and locks down sync until you verify. You wake up to a backlog of unsynced calendar updates and a security email from Microsoft.
The way to avoid this without disabling security is to know what your IP looks like before you connect, and pre-approve the location through admin settings if your platform supports it. Running a quick check on what your IP shows takes less than ten seconds and tells you exactly what the cloud will see.
Public Wi-Fi puts your sync traffic in shared space
Coffee shops, airport lounges, hotels, and co-working spaces all share IPs across hundreds of users at a time. When you sync your CRM from a Starbucks Wi-Fi, your business traffic shares a public IP with whatever else is happening on that network.
The risk is not that someone can intercept your encrypted sync traffic. Modern sync protocols (HTTPS, OAuth, certificate-pinned APIs) handle that part well. The risks are more subtle:
Reputation contamination: if another user on the same public IP has been flagged for spam, abuse, or malware activity, your traffic inherits some of that suspicion. Your sync might get throttled or challenged.
Geolocation confusion: the public IP for that coffee shop might be registered in a different city than where you actually are. Cloud services see the IP location, not your physical location, and they may behave accordingly.
Session correlation: if you use the same public Wi-Fi regularly, your work patterns become visible to anyone analyzing that network’s traffic. A coffee shop owner with basic monitoring tools can see which cloud services you use, when, and how often.
Knowing what your IP looks like from a public network helps you decide whether a given location is safe for sync-heavy work or whether you should fire up a mobile hotspot instead.
Mobile sync routes through carrier gateways, not your phone
If you sync from your phone over cellular data, the IP that shows up at the cloud is not really yours. It belongs to your carrier’s gateway, which might be hundreds of kilometers from where you actually are. A user in Seattle on T-Mobile might appear to sync from Los Angeles because that is where the carrier’s mobile gateway sits.
This matters when:
Conditional access policies block logins from certain regions and the carrier gateway is in one of those regions
Geofencing rules for license compliance (some software is licensed by region) get triggered incorrectly
Time zone settings auto-adjust based on apparent location, causing meeting reminders to fire at the wrong time
This is also why mobile carriers are getting harder to use for location-based services. Carrier-grade NAT (CGNAT) puts thousands of users behind one shared IP, and that IP’s registered location often has nothing to do with the actual user.
Remote teams and the geographic verification problem
When your team is distributed across cities or countries, every team member’s IP looks different to your shared business apps. This creates two problems.
First, security tools can struggle to distinguish legitimate distributed access from coordinated attacks. If five accounts in your organization log in from five different countries within an hour, that pattern looks like a credential compromise even when it is just a normal Monday for your remote team.
Second, audit trails get harder to read. When you review CRM access logs later, the IP and location data does not always tell you which team member accessed what record. A consultant on a hotel Wi-Fi in Singapore and a manager on a VPN exit in Frankfurt can produce log entries that look almost identical.
Knowing what each user’s IP reveals (and how that changes between home, office, mobile, and travel) gives you a baseline for what is normal for your team. Anomalies are then easier to spot at thier first occurrence rather than after the fact.
VPN use changes everything (in both directions)
A lot of business users now run VPNs for privacy or to access region-locked resources. From a sync perspective, this is a double-edged sword.
The good: your real IP and ISP are hidden from the destination. The cloud service sees the VPN provider’s exit IP, which is usually not associated with your actual location or network.
The complicated: many fraud detection systems flag VPN connections as suspicious. If your CRM provider tags VPN traffic as “high risk”, your sync attempts might get challenged repeatedly. Some platforms outright refuse to connect from known VPN ranges.
The unexpected: VPN exit IPs are shared across many users. If someone else on the same VPN exit has been doing something the platform does not like (scraping, brute forcing, mass account creation), your sync traffic inherits that reputation in the same way as public Wi-Fi does, just on a larger scale.
If you run sync over a VPN, periodically check what the destination sees. Some VPN exits are clean. Others are heavily flagged. The difference can mean the difference between smooth sync and constant authentication challenges.
What a sync app actually does with your IP
Different platforms handle IP context differently. Here is roughly what happens behind the scenes.
Microsoft 365 and Outlook sync: Microsoft logs every IP that touches your mailbox or calendar. Sign-in logs in Entra ID show the IP, geolocation, and device fingerprint for each session. Conditional access policies can require additional verification when IP context changes unexpectedly.
Google Workspace: similar to Microsoft, with detailed logs in the admin console. Google’s algorithms are particularly aggressive about flagging “suspicious” logins from new locations, which is why your phone sometimes asks you to verify it is really you when you travel.
Salesforce and other CRMs: most enterprise CRMs let admins define trusted IP ranges. Traffic from those ranges flows freely. Traffic from outside gets challenged with MFA or session restrictions. Misconfigured trust lists are a major source of sync friction in distributed teams.
Mobile sync services like iCloud, Google Sync: cloud sync providers typically log connection IPs for abuse detection, throttling, and forensic purposes. The IP is usually not exposed to the user but is recorded internally and may be shared with law enforcement under legal process.
The takeaway: your IP is part of your identity in every sync flow, whether you see it or not. Treating it as visible context (rather than invisible plumbing) helps you make better decisions about when, where, and how you sync.
How to check what your IP currently reveals
Before traveling, before connecting to a new network, before adding a new sync source, it is worth running a quick check on your current IP. The check takes less than a minute and tells you what every app you connect to is about to see.
Run a quick check on the network you plan to use. Look at:
Country and city: matches your physical location?
ISP name: is this a recognized provider, or something generic that suggests CGNAT/mobile gateway?
Network type: residential, business, mobile, hosting, or VPN?
VPN/proxy flag: are you flagged as VPN even though you are not using one?
If anything looks unexpected (wrong location, wrong ISP, unexpected VPN flag), that is exactly what your sync platforms are going to see, and they will react accordingly. Knowing in advance lets you make adjustments before the problems start.
For more detailed information including ASN, network operator, abuse contacts, and geolocation confidence, a full IP lookup gives you the full picture, including the same data that security teams at your sync providers use when evaluating connection requests.
Practical recommendations for small businesses
A few small habits make sync significantly more reliable across multiple locations and devices.
Whitelist your usual networks where possible. Most enterprise sync platforms let admins define trusted IP ranges. Add your office network, your home network if you work from home regularly, and any consistent remote workspaces. This dramatically reduces authentication friction.
Pre-warn your platforms about travel. Some services (Google in particular) allow you to inform them of upcoming travel locations. This avoids the lockouts that happen when sync suddenly originates from an unfamiliar country.
Use cellular over public Wi-Fi for sensitive sync. Mobile data is shared (via CGNAT) but at least it is not shared with strangers in the same coffee shop. For an important contract sync or a CRM update during travel, cellular is usually a safer seperate channel than free Wi-Fi.
Be consistent with VPN use, or do not use one. Intermittent VPN connections (on for some sync sessions, off for others) confuse cloud security models and trigger more authentication challenges. Either always on or always off is better than mixed.
Keep a baseline of what normal looks like. Once a quarter, check what your team’s IPs reveal during normal work. When something deviates from that baseline (unexpected country, unexpected ISP), you will spot it faster than if you have no reference point.
Audit sync app permissions periodically. Many sync apps request more access than they actually need. Reviewing which apps see which data, and where they connect from, is good hygiene that gets ignored until something breaks.
Wrap up
The internet was not designed to keep your IP private. Every connection your devices make leaks identifying information about your network, your ISP, and your approximate location. For most business sync workflows, this is invisible context that helps cloud services protect your account. Sometimes it gets in the way. Occasionally it reveals more than you expected.
The fix is not to hide. It is to know. Knowing what your IP says about you when you sync, and how that information changes as you move between networks, gives you the awareness to set up sync correctly the first time and troubleshoot it sensibly when problems come up.
Small thing, easy to check, and it makes the difference between sync that works and sync that fights you every time you switch locations.
Author note: this article is general guidance about IP address awareness for business sync workflows. Specific configurations vary by platform and organization, so check your IT documentation for platform-specific guidance.
What Your IP Address Says About You When You Sync Business Data (A Small Business Guide) was last modified: May 12th, 2026 by Colleen Borator
Everyone has that one dusty box. Inside, you find a mess of old family photos. Some have curled edges. Others have weird yellow stains. A few might even have cracks right across a relative’s face. These photos are your family history. They tell the story of where you came from. But physical prints are fragile. Fire, water, or just time can destroy them. That is why you need a digital workflow. You need to move these memories into the modern age. This guide will show you how to do it right and cover everything you need to know. You will learn to fix, scan, and save your pictures forever. Let’s get to work.
Fix the Quality First
Do not just scan a damaged photo and call it a day. If a photo has a tear, the digital copy will have that tear too. You should fix these issues before you finalize your archive. Modern technology makes this very easy. You do not need to be a pro at Photoshop. You can use specialized AI tools, such as free photo restoration software. This tool is great for a few reasons. It removes scratches and dust marks automatically. It also improves clarity and can take a blurry face and make it sharp again.
There are other tools out there too. You might want to check out Magic Memory or the MyHeritage Photo Enhancer. Fotor AI Photo Restoration is another solid choice. Each one has its own strengths. Try a few and see which one handles your specific photos best.
Get a Good Scan
Now, let’s talk about the actual digitizing process. Many people just take a picture of an old photo with their smartphone. Please, do not do this. You get glare. You get distortion. The quality is never good enough for long-term storage.
You need a real scanner. A flatbed scanner is the best tool for this job. If you have hundreds of photos, look into a high-speed photo scanner. They feed the photos through like a paper shredder, but gently.
Here are some quick tips for a perfect scan:
Clean the glass. Use a microfiber cloth. Even a tiny speck of dust looks like a huge rock on a high-res scan.
Set the resolution. Use at least 600 DPI (dots per inch). This allows you to print the photo larger later if you want.
Save as a TIFF file if you can. These files are huge, but they keep all the data. You can save a JPEG copy later for daily use.
Do not use the “Auto-Fix” settings on the scanner software. It often makes colors look fake. Use a dedicated restoration tool later instead.
Basic Processing and Cleanup
Once the images are on your computer, you need to do some light work. Most old photos have big white borders. Or maybe the photo is crooked. Use a basic editor to crop the edges. Make sure the horizon is straight.
If the color looks a bit faded, you can boost the contrast. But do not go overboard. You want the photo to look like a memory, not a neon sign. If you used the restoration tool I mentioned earlier, most of this work is already done for you.
Organize Your Digital Library
This is the part where most people fail. They have a folder named “Old Photos” with 5,000 files in it. The files are named “IMG_001” and “IMG_002.” You will never find anything that way.
You need a system. Name your files clearly. A good format is: YYYY-MM-DD-Event-Description. For example: “1974-05-12-Wedding-Mom-Dad.jpg.”
This takes time. Yes, it is boring. But ten years from now, you will be happy. You can just type “Wedding” into your search bar and find the photo in seconds.
Prepare for the Cloud
Your computer’s hard drive will eventually die. It is a fact of life. You must put your photos in the cloud. Services like Google Photos, iCloud, or Dropbox are perfect for this.
But here is a tip: check the settings. Some services compress your photos to save space. You do not want that. You worked hard for those high-quality scans. Choose the “Original Quality” upload option.
Cloud storage also makes it easy to share. You can create a shared folder for your siblings or cousins. They can add their own photos too. This turns your private project into a family history hub.
Sync Across Devices
One of the best parts of a digital workflow is access. You should be able to see your 1950s family photos on your phone, your tablet, and your TV.
Once you upload to a cloud service, download the app on all your devices. Turn on “Sync.” Now, when you show your grandma a photo on your iPad, it is right there. No wires. No thumb drives. It just works.
The Backup System (The 3-2-1 Rule)
Never trust a single copy of a photo. Even the cloud can have issues. Professionals use the 3-2-1 rule.
Have 3 copies of your data.
Use 2 different types of media (like a hard drive and the cloud).
Keep 1 copy off-site (at a friend’s house or in a different cloud provider).
Buy a cheap external portable drive. Once a month, copy your entire photo folder to it. Put that drive in a drawer at work or give it to a relative. If your house has a fire, your digital life is still safe.
Making it Searchable
Modern computers are smart. You can add “tags” or “metadata” to your photos. In Windows or Mac, you can right-click a photo and go to “Properties” or “Get Info.”
Add keywords like “Grandpa,” “Texas,” or “Classic Car.” Later, you can search for “Texas” and see every photo from that state across fifty years of history. Some AI tools even recognize faces now. They can automatically group all photos of your mother together. This is a huge time saver.
Why All This Effort Matters
You might think this sounds like a lot of work. It might take you several weekends to get through a big box of photos. But think about why you are doing it. Old photos are not just paper. They are stories. When you organize them properly, you make those stories accessible. You stop them from disappearing.
How to Organize and Preserve Old Photos in Your Digital Workflow was last modified: May 8th, 2026 by Stacey Palmer
Truth is: if you have an iPhone, you likely hate iTunes. It’s a broken fossil that sucks, making a fast data swap a massive pain. Most times, you only need your files shifted without all the extra annoyance.
Now, you can totally skip the old software. There are much quicker ways to get files from your desktop to your phone today. Whether you’re dropping in vacation images or media, you can do it stress-free. It helps you dodge all those irritating sync bugs from the old days. Learning how to transfer files to iPhone without iTunes simply saves you a ton of time.
Why You Might Want to Avoid iTunes
The aged default tool is simply a broken disaster. Searching for icons is a struggle, and that gallery takes ages to update. When you only need to move one track, sitting for the whole program to open is a total loss of time.
Also, the syncing logic is often very broken. Even with tiny files, the status bar can just freeze for no reason. Sometimes it crashes mid-way, and you have to restart the whole thing from zero. It is also very demanding. It forces you to sort files in its own strange way, and if a format is slightly rare, it won’t even attempt to work. Learning to transfer files to iPhone without iTunes is the best way to avoid these non-stop pains because most people crave a more direct path to handle their data.
Best Ways to Transfer Files to iPhone Without iTunes
Many dependable ways exist for you today. Diverse picks work perfectly on a Mac, while some are ideal for Windows folks. Here are the best strategies to reach your goal without feeling any stress during the entire simple process.
AirDrop (Best for Mac Users)
Using a Mac, AirDrop is a complete dream. Just put your Mac and iPhone nearby on a shared network. Click on your file, press share, and select your handheld. It’s very fast and works really well since it’s integrated with the Apple environment. But mind, it won’t function on Windows, and heavy data may stall if your Wi-Fi is flaky.
iCloud Drive
iCloud is Apple’s virtual vault. Merely drop items within the system folder to watch them in your mobile’s Files app. It functions great since your media remains with you constantly. The snag? You only hold 5GB for no price. If you upload long films, that volume drains away, and then you shall pay every month for more.
Third-Party Tools (Most Flexible Option)
A specialized app is best if you want zero restrictions. These tools let you move almost any file without annoying restrictions. A very good example of this is Softorino. These apps usually let you just grab a file and drop it into a window. It is super basic and saves a mountain of time.
Ditch the legacy tool and transfer files to iPhone without iTunes right to the native apps. Videos move to the player and tunes to the music app, mainly through Wi-Fi or cords. Softorino is a prime option for users who want something that simply works. It clearly helps you send files to iPhone without iTunes without requiring you to transcode data or suffer with ugly menus.
These tools handle almost every format. There is no need to update your whole device for a single file. It is direct and keeps your library tidy. This is the ultimate way to send files to iPhone without iTunes whenever you are in a rush.
Cloud Services (Google Drive, Dropbox)
Dropbox and Google Drive are super easy. Put files in from your computer, then grab them on your iPhone. They run smoothly on Windows and Mac. You just need a strong internet link, or it will take the whole day.
Messaging & Email
For tiny things, like one snap, just email it to yourself. You could also try WhatsApp or Telegram. Send the file to your own chat and open it on the phone. It is easy, but not for heavy files because they won’t fit in an email.
How to Transfer Different File Types
Multiple categories demand multiple paths for smooth moving.
Photos & Videos
For photos, AirDrop is king on Mac. On Windows, a cloud service or a direct tool is better. When you need to transfer videos to iPhone, pick a way that doesn’t kill the quality. Some apps squeeze the file and make it look grainy. Using a tool like Softorino keeps everything looking crisp. It is the best method to transfer videos to iPhone and keep the 4K resolution.
Music
Songs are difficult since you prefer them within the Music app. Basic cloud drives usually just keep it like files you can’t stream naturally. Custom programs are the perfect choice to load music on your mobile without a total, sluggish sync.
Documents
For PDFs, iCloud and Google Drive work great. After saving them, just open the Files app to find them. Other third-party tools also make it easy to organize everything into folders.
Wired vs Wireless Transfer
Cables are always faster. If you have a ton of videos or thousands of photos, plug your phone in. It is stable and doesn’t care about slow Wi-Fi. Wireless is all about being comfy. You don’t need a cord; you just send files from your desk. Use a cable for big stuff and go wireless for small things.
Conclusion
One shouldn’t feel tied to iTunes. There are numerous finer choices today. AirDrop is ideal for Mac power, whereas iCloud manages your local sync. Web platforms provide you more flexibility, and messaging is okay for an easy brief share.
Apps such as Softorino typically deliver the top results. These programs allow you to shift exactly what you want without any hassle. After you pick a good method, how to transfer files to iPhone without iTunes becomes a fast, easy job.
Easy Ways to Transfer Files to iPhone Without iTunes: A Simple Guide was last modified: May 4th, 2026 by Valery B